
Using Kubernetes with k9s
This is a tutorial for performing deployment management tasks using a convenient tool, k9s.
Ensure that the google cloud CLI tool is installed.
Configure your gcloud CLI tool by issuing
$ gcloud auth login
Load the credentials to access the GAP kubernetes clusters by running the following commands:
$ gcloud container clusters get-credentials gap-production --project ems-gap-production --region europe-west3
$ gcloud container clusters get-credentials gap-staging --project ems-gap-stage --region europe-west3
Install k9s. Make sure that you check for updates frequently, as currently the tool is under very active development. Ubuntu and Debian users can use the shell script at the bottom of this document, as neither of these distributions keep the tool up-to-date in their package manager.
To change the resource type being viewed, type a : character. This will open a textbox where you can type the name or alias of any resource type in the system. To view all accepted aliases, press ctrl+a, which always opens the list of aliases.

In the above image, you can see the aliases menu, listing that you can switch to viewing deployments by typing any of “deploy”, “deployment”, “deployments” or “dp”. You can also open the deployments by hitting enter while that line is selected.

By navigating to the namespaces resource (shortcut: :ns), you can filter resources to any namespace that you can view. Selecting namespaces this way also adds it to the namespace quick access at the top, and in the future you can simply use the number keys to filter for the namespace.

K9s also allows you to locally switch between clusters without modifying your global kubectl configuration for the default cluster. To do this, navigate to the context resource (shortcut: :ctx) and select the context that you would like to view.
For all of these resources the following actions can be performed:
/: Opens the live filter field. This is a very powerful tool that allows you to filter on any displayed and even some undisplayed columns in a resource view, and you can also filter log lines with this tool in the log view. Pressing enter keeps the filter that is currently entered. In order to clear the filter, simply hit Esc.ctrl+d: Delete the resource. For some resources (pods, replicasets), there is a governing entity that will recreate them immediately. Deletes cascade to governed resources by default in k9s, so deleting a deployment will delete all attached pods as well.d: Describes a resource in human readable terms. This is where you can view the events attached to a resource, such as when it transitioned into a different status.e: Allows you to edit the YAML of the resource in-place. Note that saving this YAML will immediately attempt to apply the changes to the cluster.l: Display the container logs from all pods managed - directly or indirectly - by the resource.y: Allows you to view the YAML of the resource. This may be larger than the YAML that you initially applied, as auto-filled values will be present.
Shortcut: :dp
All components within your application translate to a Kubernetes deployment when you specify them in your gap.yaml file.

We create these by joining your application name (gap-example-project) and your deployment name (web) with a dash.
Deployments manage replicasets, an automatically created intermediate resource that contains pods with an identical configuration. Usually, there is only one replicaset under a deployment, but there may be more active replicasets when rollouts are being performed.
Common actions that you can do with deployments:
s: Manually scale the number of pods (replicas) desired in the deployment. Kubernetes will automatically try to scale the number of desired pods. This number can be 0 - in this case, the deployment exists with no pods under it.ctrl+t: Performs a rollout restart on the deployment. By default on GAP, a rollout restart will always wait for the creation of a new pod before tearing down an old one to ensure that the application is always reachable.shift+f: Allows you to port forward to a selected container of a random pod within the deployment. See container commands for an explanation of port forwarding.enter: Shows the pods that are managed by the deployment.
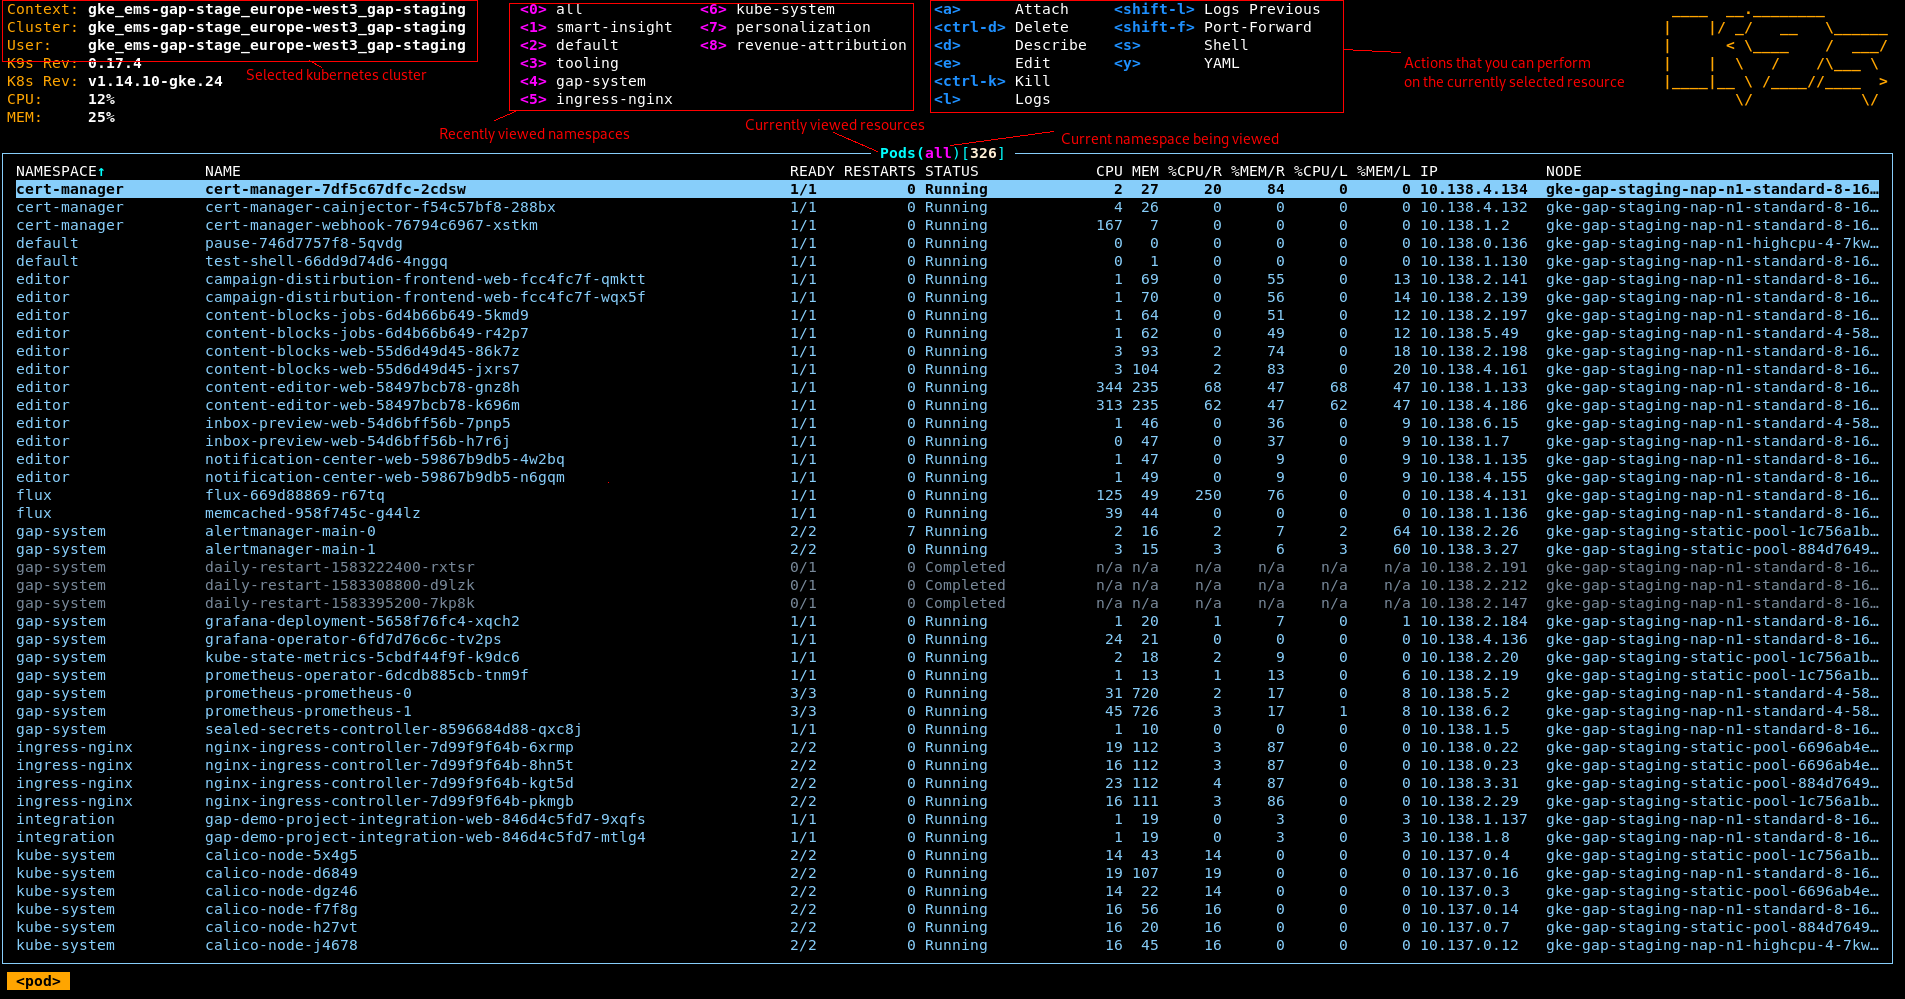
Shortcut: :pod
Pods are a unit that is allocated on a node to run your application. Each pod consists of a number of containers; including your application and any number of sidecar containers that run alongside your application. Pods can exist independently, or as part of a deployment or job.

The name of pods created through deployments is generated by appending the unique ID of a replicaset and the unique ID of the pod to the name of deployment. Deleting a pod managed by a deployment will trigger the creation of a new, identical pod - therefore, you when you need to restart pods, you can simply delete them.
K9s also shows operational metrics of your pods. The CPU and MEM columns display absolute value of usage - the unit of measurement for the CPU column is mCPU (1/1000th of a core) and MiB for the MEM column. The CPU/R and MEM/R columns display the percentage of resources used compared to the requested amount. If either of these columns is a value greater than 100 for an extended period of time, consider increasing the requested resources of your deployment. If the CPU request is exceeded, your pod will be CPU throttled; and if the MEM request is exceeded, your pod has a higher chance of being removed if space is required on the node. The CPU/L and MEM/L columns show the percentage of resources used compared to the limit. You cannot ever use more CPU than your limit, and if you reach the MEM limit, the pod will be terminated with an OOMKilled reason.
Common actions that you can do with pods:
ctrl+k: Kills the pod immediately - effectively the same operation as deletion, except this triggers and immediate and ungraceful termination.s: Attempts to open an interactive shell into a container of your pod - if there are multiple running containers within the pod, you will be given the option to choose a container. If successful, k9s will transfer you to the remote bash process.shift+f: Port forward to a selected port of a container in the pod. See container commands for an explanation of port forwarding.enter: Shows the containers within the pod.
Containers are exactly what you would expect - a container running within a pod.
Common container actions:
shift+f: Port forward to a selected port of a container. When you port forward to a container, you bind one of the container’s exposed ports to a local port. While k9s is running, you can access an application that you port forwarded to - for example - the local port :8080 at localhost:8080. Exiting k9s terminates the port forward.s: Opens an interactive shell into the container.
Shortcut: :cm
Configmaps are a list of environment variables. For the time being, this is where we store your non-secret environment, though this is subject to change in the future.
You can edit environment variables here, but note that you need to perform a rollout restart on any deployment that uses it for the changes to take effect in your application.
Shortcut: :sec
Secrets are like config maps in a lot of ways, except they are stored in a base64 encoded form in Kubernetes. Like config maps, you edit these in-place and perform a rollout restart on your deployments for the changes to take effect.
Shortcut: :sts
Stateful sets are a resource you are unlikely to use, but they are listed because certain current or future cluster operational services, such as Prometheus or Vault live in stateful sets. These sets are a lot like deployments in that they manage pods, however, they allow control over state if pods require a stable network identify, persistent storage or ordered operations.
Common stateful set actions:
enter: View pods.
Shortcut: :hpa
If you configure autoscaling for your deployments, this is where a pod autoscaler will be created. Editing a HPA in-place can allow you to increase or reduce the minimum or maximum autoscaling limit in case of an emergency. It also allows you to review autoscaling events (when and how many times were new pods rotated in or out), as well as the current value of the resource metric compared to the autoscaling condition.
Shortcut: :cj
Cronjobs are scheduled tasks whose purpose is to execute a command as often as it is required to by a provided crontab syntax. Creating schedulers/cronjobs in your gap.yaml will create cronjobs.

You can suspend the execution of a cronjob manually by editing its yaml and setting the suspend field to true - similarly you can unsuspend it by setting it to false. Note that this only preempts future runs of the cronjob and does not stop a currently executing job from running.
When a cronjob executes, it creates a job object to track a specific execution. The name of this job resource is the name of the cronjob joined to the execution timestamp with a dash.
Cronjobs by default retain the job object from the last failed and the 3 last successful runs.
Common cronjob actions:
ctrl+t: Trigger the execution of a cronjob immediately. This creates a manual execution job.enter: View jobs in the same namespace as the cronjob.
Shortcut: :job
Jobs are one-off tasks whose purpose is to ensure that a pod runs and executes successfully exactly as many times as specified - by default, this is 1. The prime difference between running a pod and inserting a job that runs a pod once is that the job will keep track of the pod execution and automatically retry on failure.
Retained jobs retain their completed pods for logging purposes.
Note that in order for an execution to be considered successful, all containers within the pod must not only run but also exit correctly.
Common job actions:
enter: View the pod(s) managed by the job.
Shortcut: :ev
Events are essentially kubernetes log entries. Each “log line” is represented by an event object, complete with an involved object, a type (severity), and a reason (short description of the event). Events are aggregated and displayed when you describe another resource, but you can view them here directly unaggregated, which may be useful from time to time. Note that events are largely operational logs and may hold very little information about what is wrong with your application.
#!/usr/bin/env bash

set -e

CURRENT_RELEASE=$(cat ~/.k9s-version 2>/dev/null || echo "v0.0.1")

LATEST_RELEASE=$(curl -L -w %{url_effective} -o /dev/null https://github.com/derailed/k9s/releases/latest 2>/dev/null | sed 's/.*tag\///g')

if [[ "$LATEST_RELEASE" != "$CURRENT_RELEASE" ]]; then
(
	cd ~
	curl -L https://github.com/derailed/k9s/releases/download/${LATEST_RELEASE}/k9s_Linux_x86_64.tar.gz | tar -xvz k9s
	sudo mv k9s /usr/bin/k9s
	echo $LATEST_RELEASE > ~/.k9s-version
	echo "Updated to ${LATEST_RELEASE}."
)
else
	echo "No new releases."
fi